This is my work-in-progress version of the new tauri
documentation. Beware of typos, inaccuracies, mistakes and missing
pages!
Tauri is a toolkit that helps developers make applications for the
major desktop platforms - using virtually any frontend framework in
existence. The core is built with Rust, and the CLI leverages Node.js
making Tauri a genuinely polyglot approach to creating and maintaining
great apps.
Once in a while, we will show you code examples that do not work or do
not compile. In most situations, we lead you to correct solution and
the Rust mascot Ferris will always draw your attention to code that
isn't meant to work:
The first step is to install Rust and System Dependencies. Keep in
mind that this setup is only needed for developing Tauri apps. Your
end-users are not required to do any of this. You'll need an internet
connection for the download.
For those using the Windows Subsystem for Linux (WSL), please refer
to our Linux specific instructions instead.
On Windows, go to
https://www.rust-lang.org/tools/install to install
rustup the Rust installer. You also need to install Microsoft Visual
Studio C++ build tools. The easiest way is to install Build Tools for
Visual Studio 2019. When asked which workloads to install, ensure
"C++ build tools" and the Windows 10 SDK are selected.
Tauri heavily depends on WebView2 to render web content on Windows,
therefore you must have WebView2 installed. The easiest way is to
download and run the Evergreen Bootstrapper from the official
website. The bootstrapper script will try to
determine the correct architecture and version for your system. Still,
if you run into issues - especially with Windows on ARM - you can
select te correct Standalone Installer or even a fixed version.
To install Rust on macOS, open a terminal and enter the following
command:
curl --proto '=https' --tlsv1.2 https://sh.rustup.rs -sSf | sh
We have audited this bash script, and it does what it says it is
supposed to do. Nevertheless, before blindly curl-bashing a script,
it is always wise to look at it first. Here is the file as a plain
download link.
The command downloads a script and starts the installation of the
rustup tool, which installs the latest stable version of Rust. You
might be prompted for your password. If the installation was
successful, the following line will appear:
Rust is installed now. Great!
You also need to install CLang and macOS development dependencies. To
do this, run the following command in your terminal:
To install Rust on Linux, open a terminal and enter the following
command:
curl --proto '=https' --tlsv1.2 https://sh.rustup.rs -sSf | sh
We have audited this bash script, and it does what it says it is
supposed to do. Nevertheless, before blindly curl-bashing a script,
it is always wise to look at it first. Here is the file as a plain
download link.
The command downloads a script and starts the installation of the
rustup tool, which installs the latest stable version of Rust. You
might be prompted for your password. If the installation was
successful, the following line will appear:
Rust is installed now. Great!
You also need to install a couple of system dependencies, such as a C
compiler and webkit2gtk. Below are commands for a few popular
distributions.
To run a graphical application with WSL, you need to download one of
these X servers: Xming, Cygwin X, and vcXsrv. Since vcXsrv has been
used internally, it's the one we recommend installing.
Tauri and its components can be manually updated by editing the
Cargo.toml file or running the cargo upgrade command that is part
of the cargo-edit tool. Open a terminal and enter the following
command:
cargo upgrade
Updating Rust itself is easy via rustup. Open a terminal and run the
following command:
rustup update
rustup can also be used to uninstall Rust from your machine fully:
The Tauri CLI is the magic glue, that makes it all work: It
orchestrates your frontend development server and cargo during
development and bundles the rust binary and associated resources
(sidecars or icons) into the final distributable app. You can install
it from various sources, depending on your preference:
If you don't want to build the CLI from source or want to lock and
version it for reproducible builds, we also distribute the CLI as an
NPM package: @tauri-apps/cli.
Now that you have completed the Quick Start and have a basic Tauri
application at hand, it is tempting to jump right in. I invite you,
however, to resist this temptation for a couple more pages and learn
more about the concepts and ideas behind Tauri. You will find
developing an app is much like creating a traditional client-server
application on the web, with a couple of subtle but important
differences.
This chapter will cover Tauris multi-process architecture, windows,
and webviews and our design decisions to make your application more
secure and resource efficient.
Tauri employs a multi-process architecture similar to Electron or many
modern web browsers. This guide explores the reasons behind the design
choice and why it is key to writing secure applications.
In the early days of GUI applications, it was common to use a single
process to perform computation, draw the interface and react to user
input. As you can probably guess, this meant that a long-running,
expensive computation would leave the user interface unresponsive or,
worse, a failure in one app component would bring the whole app
crashing down.
It became clear that a more resilient architecture was needed, and
applications began running different components in different
processes. This makes much better use of modern multi-core CPUs and
creates far safer applications. A crash in one component doesn't
affect the whole system anymore, as components are isolated on
different processes. If a process gets into an invalid state, we can
easily restart it.
We can also limit the blast radius of potential exploits by handing
out only the minimum amount of permissions to each process, just
enough so they can get their job done. This pattern is known as the
Principle of least privilege, and you see it in the real world all
the time. If you have a gardener coming over to trim your hedge, you
give them the key to your garden. You would not give them the keys
to your house; why would they need access to that? The same concept
applies to computer programs. The less access we give them, the less
harm they can do if they get compromised.
Each Tauri application has a single core process, which acts as the
application's entry point and which is the only component with full
access to the operating system.
The Core's primary responsibility is to use that access to create and
orchestrate application windows, system-tray menus, or notifications.
Tauri implements the necessary cross-platform abstractions to make
this easy. It also routes all Inter-Process Communication through
the Core process, allowing you to intercept, filter, and manipulate
IPC messages in one central place.
The Core process should also be responsible for managing global state,
such as settings or database connections. This allows you to easily
synchronize state between windows and protect your business-sensitive
data from prying eyes in the Frontend.
We chose Rust to implement Tauri because its concept of Ownership
guarantees memory safety while retaining excellent performance.
flowchart TD
    C{Core}
    W1[WebView]
    W2[WebView]
    W3[WebView]

    C <-->|Events & Commands| W1
    C <-->|Events & Commands| W2
    C <-->|Events & Commands| W3
Figure 1-1: Simplified representation of the Tauri process model. A single Core process manages one or more WebView processes.
The Core process doesn't render the actual user interface (UI) itself;
it spins up WebView processes that leverage WebView libraries provided
by the operating system. A WebView is a browser-like environment that
executes your HTML, CSS, and JavaScript.
This means that most of your techniques and tools used in traditional
web development can be used to create Tauri applications. For example,
many Tauri examples are written using the Svelte frontend framework
and the Vite bundler. Security best practices apply as well;
for example, you must always sanitize user input, never handle secrets
in the Frontend and ideally defer as much business logic to the Core
process as possible to keep your attack surface small.
Contrary to other similar solutions, the WebView libraries are not
included in your final executable but dynamically linked at
runtime1. This makes your application significantly smaller, but
it also means that you need to keep platform differences in mind, just
like traditional web development.
Inter-Process Communication (IPC) allows isolated processes to
communicate securely and is key to building more complex applications.
Tauri uses a particular style of Inter-Process Communication called
Asynchronous Message Passing, where processes exchange requests
and responses serialized using some simple data representation.
Message Passing should sound familiar to anyone with web development
experience, as this paradigm is used for client-server communication
on the internet.
Message passing is a safer technique than shared memory or direct
function access because the recipient is free to reject or discard
requests as it sees fit. For example, if the Tauri Core process
determines a request to be malicious, it simply discards the requests
and never executes the corresponding function.
In the following, we explain Tauri's two IPC primitives - Events and
Commands - in more detail.
Events are fire-and-forget, one-way IPC messages that are best suited
to communicate lifecycle events and state changes. Contrary to
Commands Events can be emitted by both the Frontend and
the Tauri Core.
sequenceDiagram
    participant F as Frontend
    participant C as Tauri Core

    C-)F: Event
Figure 1-2: An event sent from the Core to the Frontend.
Tauri also provides a foreign function interface-like abstraction on
top IPC messages1. The primary API, invoke, is similar to the
browsers fetch API and allows the Frontend to invoke rust functions,
pass arguments, and receive data.
Because this mechanism uses the JSON-RPC protocol under the hood to
serialize requests and responses, all arguments and return data must
be serializable to JSON.
sequenceDiagram
    participant F as Frontend
    participant C as Tauri Core

    F-)+C: IPC request
    note over C: Perform computation, write to file system, etc.
    C-)-F: Response
Figure 1-3: IPC messages involved in a command invocation.
1
Commands still use message passing under the hood, so don't share the same
security pitfalls as real FFI interfaces.
Whether you like it or not, today's applications live in operating
systems that can be -- and regularly are -- compromised by any number
of attacks. When your insecure application is a gateway for such
lateral movement into the operating system, you are contributing to
the tools that professional hackers have at their disposal. Don't be a
tool.
This is why we have taken every opportunity to help you secure your
application, prevent undesired access to system level interfaces, and
manufacture bullet-proof applications. Your users assume you are
following best practices. We make that easy, but you should still read
up on it below.
It is important to remember that the security of your Tauri
application is the result of the overall security of Tauri itself, all
Rust and NPM dependencies, your code, and the devices that run the
final application. The Tauri Team does its best to do its part, the
security community does its part, and you too would do well to follow
a few important best practices:
Keep your application up-to-date. When releasing your app into
the wild, you are also shipping a bundle that has Tauri in it.
Vulnerabilities affecting Tauri may impact the security of your
application. By updating Tauri to the latest version, you ensure
that critical vulnerabilities are already patched and cannot be
exploited in your application. Also be sure to keep your compiler
(rustc) and transpilers (nodejs) up to date, because there are often
security issues that are resolved.
Evaluate your dependencies. While NPM and Crates.io provide many
convenient packages, it is your responsibility to choose trustworthy
3rd-party libraries - or rewrite them in Rust. If you do use
outdated libraries affected by known vulnerabilities or are
unmaintained, your application security and good-night's sleep could
be in jeopardy. Use tooling like npm audit and cargo audit to
automate this process and lean on the security community's important
work.
Adopt more secure coding practices. The first line of defense
for your application is your own code. Although Tauri can protect
you from common web vulnerabilities, such as Cross-Site Scripting
based Remote Code Execution, improper configurations can have a
security impact. Even if this were not the case, it is highly
recommended to adopt secure software development best practices and
perform security testing. We detail what this means in the next
section.
Educate your Users. True security really means that unexpected
behaviour cannot happen. So in a sense, being more secure means
having the peace of mind in knowing that ONLY those things that you
want to happen can happen. In the real world, though, this is a
utopian "dream". However, by removing as many vectors as possible
and building on a solid foundation, your choice for Tauri is a
signal to your users that you really care about them, their safety,
and their devices.
Tauri applications are composed of many pieces at different points of
the lifecycle. Here we describe classical threats and what you SHOULD
do about them.
Upstream Threats. Tauri is a direct dependency of your project,
and we maintain strict authorial control of commits, reviews, pull
requests, and releases. We do our best to maintain up-to-date
dependencies and take action to either update or fork&fix. Other
projects may not be so well maintained, and may not even have ever
been audited. Please consider their health when integrating them,
because otherwise you may have adopted architectural debt without
even knowing it.
Development Threats. We assume that you, the developer, care for
your development environment like a shrine of purity because it is a
thing of beauty. It is on you to make sure that your operating
system, build toolchains, and associated dependencies are kept up to
date.
A genuine risk all of us face is what is known as "supply-chain
attacks", which are usually considered to be attacks on direct
dependencies of your project. However, a growing class of attacks in
the wild directly target development machines, and you would be
well-off to address this head-on. One practice that we highly
recommend, is to only ever consume critical dependencies from git
using hash revisions at best or named tags as second best. This
holds for Rust as well as the Node ecosystem. Also, consider
requiring all contributors to sign their commits and protect GIT
branches and pipelines.
Buildtime Threats. Modern organisations use CI/CD to manufacture
binary artifacts. At Tauri, we even provide a Github Workflow for
building on multiple platforms. If you create your own CI/CD and
depend on third-party tooling, be wary of actions whose versions you
have not explicitly pinned. You should sign your binaries for
the platform you are shipping to, and while this can be complicated
and somewhat costly to setup, end-users expect that your app is
verifiably from you.
Runtime Threats. We assume the webview is insecure, which has
led Tauri to implement several protections regarding webview access
to system APIs in the context of loading untrusted userland content.
You can read more in detail below, but using the CSP will
lockdown types of communication that the Webview can undertake.
Furthermore, Context Isolation prevents
untrusted content or scripts from accessing the API within the
Webview. And please, whatever you do, DO NOT trust the
results of cryptography using private keys in the Webview. We gave
you Rust for a reason.
Updater Threats. We have done our best to make shipping
hot-updates to the app as straightforward and secure as possible.
However, all bets are off if you lose control of the manifest
server, the build server, or the binary hosting service. If you
build your own system, consult a professional OPS architect and
build it properly.
Tauri restricts the Content Security Policy (CSP) of your HTML
pages. Local scripts are hashed, styles and external scripts are
referenced using a cryptographic nonce, which prevents unallowed
content from being loaded.
❗️ Avoid loading remote content such as scripts served over a CDN
as they introduce an attack vector, but any untrusted file can
introduce new and subtle attack vectors.
The CSP protection is only enabled if [tauri > security > csp] is set
on the Tauri configuration file. You should make it as restricted as
possible, only allowing the webview to load assets from hosts you
trust and preferably own. At compile time, Tauri appends its nonces
and hashes to the relevant CSP attributes automatically, so you only
need to worry about what is unique to your application.
Context Isolation is a way to intercept and modify Tauri API messages
sent by the Frontend before they get to Tauri Core, all with
JavaScript. The secure JavaScript code that is injected by the
Isolation pattern is referred to as the Isolation application.
This is useful to validate, sanitize, and filter messages sent to the
front end before they even enter the Core's secure context.
The Isolation pattern's purpose is to provide a mechanism for
developers to help protect their application from unwanted or
malicious frontend calls to Tauri Core. The need for the Isolation
pattern rose out of threats coming from untrusted content running on
the Frontend, a common case for applications with many dependencies.
See Security: Threat Models for a list of many sources of threats
that an application may see.
The largest threat model described above that the Isolation pattern
was designed in mind with was Development Threats. Not only do many
frontend build-time tools consist of many dozen (or hundreds) of often
deeply-nested dependencies, but a complex application may also have a
large amount of (also often deeply-nested) dependencies that are
bundled into the final output.
Tauri highly recommends using the isolation patten whenever it can be
used. Because the Isolation application intercepts all messages from
the Frontend, it can always be used.
We highly suggest that you lock down your application whenever you use
external Tauri APIs. As the developer, you can utilize the secure
Isolation application to verify IPC inputs make sure they are within
some expected parameters. For example, you may want to check that a
call to read or write a file is not trying to get to a path outside
your application's expected locations. Another example is making
sure that a Tauri API HTTP fetch call is only setting the Origin
header to what your application expects it to be.
That said, it intercepts all messages from the Frontend, so it will
even work with always-on APIs such as Events. Since some events may
cause your rust code to perform actions, the same validation
techniques can be used.
An Isolation Application is essentially a just JavaScript file that
Tauri will run in a locked-down, isolated environment. You assign a
callback to the window.__TAURI_ISOLATION_HOOK__ global property that
Tauri will invoke whenever an IPC message is about to be sent.
Because the point of the Isolation application is to protect against
Development Threats, we highly recommend keeping your Isolation
application as simple as possible. Fewer dependencies and build
steps mean less risk of supply chain attacks against your Isolation
application.
We will make a small hello-world style Isolation application and hook
it up to an imaginary existing Tauri application. It will do no
verification of the messages passing through it, only print the
contents to the WebView console.
For the purposes of this example, let's imagine we are in the same
directory as tauri.conf.json. The existing Tauri application has
it's distDir set to ../dist.
If you want to fully understand how the Context Isolation is
implemented, so you can properly secure your application, we go into
more detail below.
sequenceDiagram
    autonumber

    participant F as Frontend
    participant H as Isolation Handler
    participant I as Isolation Application
    participant C as Tauri Core

    F-)H: Send Message
    H-)+I: Call the Isolation Application with Message
    I-)-H: Return sanitized Message
    note over H: Automatically encrypt sanitized Message
    H-->>F: Send encrypted, sanitized Message
    F-->>C: Send encrypted, sanitized Message
Figure 1-4: Approximate Steps of an IPC Message being sent to Tauri Core with Context
Isolation enabled.
When invoke is called, the Message gets sent to the Isolation
Application.
Pass the message into the Isolation Application's hook. The Message
object has been checked to follow the minimum correct shape.
The return value is used as the new Message. The Isolation
Application may have modified Message to help sanitize input.
The sanitized Message is automatically encrypted using AES-GCM
using a runtime-generated key and sent to the Frontend.
The encrypted, sanitized message is sent to Tauri Core; which
exclusively processes encrypted messages while Context Isolation is
enabled.
Because encryption of the message does occur, this does mean that
there are additional overhead costs even if the secure Isolation
application doesn't do anything. Most applications should not notice
the runtime costs of encrypting/decrypting the IPC messages as they
are both relatively small and AES-GCM is relatively fast. If you are
unfamiliar with AES-GCM, all that is relative in this context is that
it's the only authenticated mode algorithm included in SubtleCrypto
and that you probably already use it every day under the hood with
TLS.
There is also a cryptographically secure key generated once each time
the Tauri application is started. It is not generally noticeable if
the system already has enough entropy to immediately return enough
random numbers, which is extremely common for desktop environments. If
running in a headless environment to perform some [end-to-emd testing
with WebDriver] then you may want to install some sort of entropy
generating service such as haveged if your operating system does
not have one included.
Linux 5.6 (March 2020) now includes entropy generation using
speculative execution.
There are a few limitations with Context Isolation due to platform
inconsistencies. The most significant limitation is due to external
files not loading correctly inside sandboxed iframes on Windows.
Because of this, we have implemented a simple script inlining step
during build time that takes the content of scripts relative to the
Isolation application and injects them inline. This means that typical
bundling or simple including of files like
<script src="index.js"></script> still works properly, but newer
mechanisms such as ES Modules will not successfully load.
We established the general concepts and ideas behind IPC in
Background: Inter-Process Communication. This guide teaches you how
to put that theory to practice and interact with the IPC system from
both JavaScript and Rust.
Events are one-way IPC messages and come in two distinct flavors:
Global Events and Window-specific Events. Global events are
emitted for application-wide lifecycle events (e.g. update events),
while window-specific events are, as the name suggests, emitted for
window lifecycle events like resizing, moving, or user-defined events.
At its simplest, a Command is a Rust function that is invoked in
response to an incoming IPC request. This function has access to the
application state, windows, may take input parameters, and returns
data. You can think of them almost like [Serverless Functions] that
live in the Tauri Core process and communicate over IPC.
To turn a Rust function into a Command, add #[tauri::command] to the
line before fn. This Attribute Macro wraps your function, handles
JSON serialization, and injects
Special Paramaters.
Listing 2-TODO: A regular Rust function turned into a Command by the
tauri::command macro.
You can use the invoke() function provided by the @tauri-apps/api
package to call Commands from the Frontend. The function requires the
Command name and optional parameters and returns a promise that
resolves when the Command finished executing:
import { invoke } from "@tauri-apps/api";

await invoke("my_custom_command");
Listing 2-TODO: A command invocation without parameters.
Commands can have parameters, which are defined like regular Rust
function parameters. Tauri will reject IPC requests for a command if
the argument number, types, or names are invalid.
All parameters must implement serde::Deserialize so the
tauri::command macro can correctly parse the incoming IPC request.
Standard types such as u8, String or bool are deserializable by
default, but you have to derive or manually
implementserde::Deserialize for
types you defined yourself.
#[tauri::command]
fn my_command(msg: String) {
    println!("I was invoked with this message: {}", msg);
}
Listing 2-TODO: Simple command accepting only a single parameter.
Commands that only have access to the parameters passed from the
Frontend aren't too helpful, so the tauri::command macro has a
couple of tricks up its sleeve. If you specify any of the following
types as parameters to your function, they will be automagically
injected by the macro.
tauri::Window - A handle to the window that invoked the Command.
tauri::State<T> - Tries to inject globally
managed state T. This requires that you previously called
manage(T).
The tauri::command macro strips Special Parameters from the function
signature, so they are invisible to the Frontend as Listing 2-TODO
shows.
#[tauri::command]
fn my_command(window: tauri::Window, _app_handle: tauri::AppHandle) {
    println!("I was invoked from window: {}", window.label());
}
invoke("my_command");
Listing 2-TODO: Special Parameters are invisible to the Frontend.
You can instruct the macro to inject globally managed state by using
the tauri::State type. This only works with types that you
previously stored in the globaly state with manage(), see the
State Management guide for more details.
struct DBConnection(Option<DBClient>);

#[tauri::command]
fn is_connected(connection: State<'_, DBConnection>) -> bool {
    // return true if `connection` holds a `DBClient`
    connection.0.is_some()
}

fn main() {
    tauri::Builder::default()
        .invoke_handler(tauri::generate_handler![is_connected])
        .setup(|app| {
            app.manage(DBConnection(None));

            Ok(())
        })
        .run()
        .expect("failed to run app");
}
Listing 2-TODO: Using State to inject global application state in
commands.
Note: It's an informal convention that you put Special
Parameters before any regular Parameters.
Commands can return values to the Frontend, exactly like regular Rust
functions, with one caveat: Return values must be representable as
JSON. In Rust we say that the type needs to implement
serde::Serialize.
Most standard types such as u8, String or bool already implement
serde::Serialize by default and even more complex types such as
HashMap<K,V> can be serialized as long as both generic types
implement serde::Serialize. For types that you defined yourself you
need to either derive the trait or implement
it manually.
#[tauri::command]
fn simple_command() -> String {
  "Hello from Rust!".into()
}

#[derive(serde::Serialize)]
struct Data {
  some_key: String,
  some_other_key: bool,
  more_complex_value: HashMap<String, DataInner>
}

#[derive(serde::Serialize)]
struct DataInner(Vec<u8>);

#[tauri::command]
fn complex_command() -> Data {
  let mut map = HashMap::default();

  map.insert("first", DataInner(vec![1,2,3,4]));

  Data {
    some_key: "foobar".to_string(),
    some_other_key: true,
    more_complex_value: map,
  }
}
const msg = invoke("simple_command");

// prints "Hello from Rust!"
console.log(msg.payload);

const data = invoke("complex_command");

// prints the following:
// {
//  some_key: "foobar",
//  some_other_key: true,
//  more_complex_value: {
//      first: [1,2,3,4]
//  }
// }
console.log(data.payload);
Listing 2-TODO: Simple and complex command return values, showing how
derive(Serde::Serialize) can be used to return user-defined types.
Rust has a standard way to represent failures in functions: The
Result<T, E> type. It is an enum with two variants, Ok(T),
representing success, and Err(E), representing error.
As you learned earlier Command invocations are represented by a
JavaScript promise. By returning a Result from your Command you can
directly influence the state of that promise: Returning Ok(T)
resolves the promise with the given T, while returning Err rejects
the promise with E as the error.
If you try this using real-world functions, however, you quickly run
into a problem: No error type implements serde::Serialize!
use std::fs::File;
use std::io;
use std::io::Read;

#[tauri::command]
fn read_file() -> Result<String, io::Error> {
    let mut f = File::open("hello.txt")?;
    let mut s = String::new();
    f.read_to_string(&mut s)?;

    Ok(s)
}
Listing 2-TODO: This code does not compile because std::io::Error is
not serializable.
You could just use an error type, for example, String like we did in
Listing-TODO, but that is not very idiomatic. Instead, we create a
custom error type that implements serde::Serialize. In the
following example, we use a crate called thiserror to help create
the error type. It allows you to turn enums into error types by
deriving the thiserror::Error trait. You can consult its
documentation for more details.
// create the error type that represents all errors possible in our program
#[derive(Debug, thiserror::Error)]
enum Error {
  #[error(transparent)]
  Io(#[from] std::io::Error)
}

// we must manually implement serde::Serialize
impl serde::Serialize for Error {
  fn serialize<S>(&self, serializer: S) -> Result<S::Ok, S::Error>
  where
    S: serde::ser::Serializer,
  {
    serializer.serialize_str(self.to_string().as_ref())
  }
}
A custom error type has the advantage of making all possible errors
explicit so readers can quickly identify what errors can happen. This
saves other people (and yourself) enormous amounts of time when
reviewing and refactoring code later. It also gives you full
control over the way your error type gets serialized. In the above
example, we simply returned the error message as a string, but you
could assign each error a code similar to C.
If your Command spends time waiting for IO - maybe it is reading a
file or connecting to a server - it blocks the main process for that
duration. This means the window becomes unresponsive, and your app
freezes. To avoid this problem Rust has builtin support
asynchronous functions through the Future Trait. A familiar
concept if you already know about Promise and async/await in
JavaScript.
You declare an asynchronous command by writing async fn instead of
fn:
#[tauri::command]
async fn async_command() {}
Async Commands are executed on a thread pool using
tauri::async_runtime::spawn(), so long-running tasks no longer
block the Core's main thread. Because Commands map to JavaScript
promises in the Frontend, they also don't block the Frontend's main
thread.
To execute non-async, regular Commands on a different thread,
define the macro like so: #[tauri::command(async)].
Listing-TODO shows a more complete example that uses the non-blocking
tokio::fs::read() function to read a file from disk, convert it to a
Utf8 string and parse it into a Vec of lines. It also uses the
previously introduced thiserror and serde::Serialize to create a
custom Error type.
use std::path::PathBuf;

// A custom error type that represents all possible in our command
#[derive(Debug, thiserror::Error)]
enum Error {
    #[error("Failed to read file: {0}")]
    Io(#[from] std::io::Error),
    #[error("File is not valid utf8: {0}")]
    Utf8(#[from] std::string::FromUtf8Error),
}

// we must also implement serde::Serialize
impl serde::Serialize for Error {
  fn serialize<S>(&self, serializer: S) -> Result<S::Ok, S::Error>
  where
    S: serde::ser::Serializer,
  {
    serializer.serialize_str(self.to_string().as_ref())
  }
}

async fn async_read_lines(path: PathBuf) -> Result<Vec<String>, Error> {
    // read bytes a non-blocking way
    let bytes = tokio::fs::read(path).await?;

    // convert bytes into utf8 string
    let string = String::from_utf8(bytes)?;

    // splitting at newline characters
    let lines = string
        .split('\n')
        .map(|line| line.to_string())
        .collect::<Vec<_>>();

    Ok(lines)
}
Listing 2-TODO: A more complete examples that uses non-blocking APIs to read a file into a Vec of lines.
A Tauri application consists of one or more windows that are managed
by the Core process. Each window is identified by a unique string
label that you can freely choose when creating the window. You can use
this label to retrieve a reference to a specific window later to, for
example, resize a specific window.
The WindowBuilder can be used to configure and create windows with
a wide range of configurable options, as you can see in the
Listing-TODO below.
fn main() {
    tauri::Builder::default()
        .setup(|app| {
            WindowBuilder::new(
                    app,
                    "example_window", // the unique label
                    WindowUrl::App("index.html".into())
                )
                .title("Example Window")
                .resizable(true)
                .min_inner_size(1000,500)
                .max_inner_size(1200,700)
                .always_on_top(true)
                .build()
                .expect("failed to create example window");
        })
        .run()
        .expect("failed to run app");
}
Listing 2-TODO: Creating a new using the WindowBuilder and setting
various options.
If you are unfamiliar with Rust programming or are looking for a
quick, no-hassle way to create windows, Tauri also supports declaring
them in the tauri.conf.json file.
Each window contains one webview that lets you render the actual UI
using HTML, CSS and JavaScript. This makes Tauri compatible with
virtually any frontend framework in existence.
During development you point Tauri at a localhost URL - your
development server - so that you can leverage hot module reloading
(HMR) provided by your favourite frontend build tool. For
production builds however, you need to hand over static files that
Tauri will inline into the final binary during building. This should
feel familiar if you have build a website using a static file hosting
service like Netlify or GitHub Pages before.
In the following examples we will be using the Vite frontend
bundler, but you can choose any Frontend build tools that can produce
static files.
"build": {
    // the command that will start our local development server
    "beforeDevCommand": "vite",
    // the localhost URL that our development server is listening on
    "devPath": "http://localhost:3000",
    // the command that will produce the static files during building
    "beforeBuildCommand": "vite build",
    // the directory where the static files will be placed by vite
    "distDir": "dist"
}
As you learned previously, Tauri does ship a
webview but relies on the webviews provided by each operating system
instead. This means that not all browser APIs will be supported on all
platforms you target, WebView2 uses an evergreen updater that always
gives you the latest Chromium Features, while WKWebview versions are
tied to the macOS versions. You can refer to Appendix C: Version
Tables to get a detailed list of macOS versions and corresponding
safari and webkit versions.
Don't despair however, platform differences are common in web
development (think of IE11) and there are many tools that can aid you
in writing elegant cross-platform JavaScript.
Note: ES2021 is supported across all Tauri platforms, so most
language features should work out-of-the-box without transpilation.
Use a Transpiler. Transpilers like [Babel] take your modern
JavaScript and produce Code that works on older platforms,
polyfilling unsupported features in the process. If you're using
Typescript you already have a builtin transpiler too!
Use feature detection. Feature detection is a good practice on
the web in general, but with Tauri you can make use of several
build-time environment variables like TAURI_PLATFORM or
TAURI_PLATFORM_VERSION to generate platform-specific JavaScript.
These variables are exposed to the beforeDevCommand and
beforeBuildCommand by default.
Filename: vite.config.js
 {
     // to make use of
     // `TAURI_PLATFORM`, `TAURI_ARCH`, `TAURI_FAMILY`,
     // `TAURI_PLATFORM_VERSION`, `TAURI_PLATFORM_TYPE`
     // and `TAURI_DEBUG` env variables in the Frontend
     envPrefix: ["VITE_", "TAURI_"],
     build: {
         // tauri supports es2021
         target: [
         "es2021",
         process.env.TAURI_PLATFORM === "windows" ? "chrome97" : "safari13",
         ],
         // don't minify for debug builds
         minify: !process.env.TAURI_DEBUG && "esbuild",
         // produce sourcemaps for debug builds
         sourcemap: !!process.env.TAURI_DEBUG,
     },
 };
Listing 2-TODO: Conditional compilation in vite using TAURI_ environment variables.
Use Rust. Instead of relying on features that are not supported
across all platforms you can replace them with Rust implementations
that are exposed via Commands. The tauri-plugin-store is an
example of such a practice, it replaces LocalStorage with a much
more customizable solution written in Rust.
With all the moving pieces in a Tauri application, chances are you
will not write perfect bug-free code all the time. Your app might
behave weirdly, be very slow, or outright crash.
In this guide, we give you a number of tools and techniques to
troubleshoot problems when they arise.
When your first learned Rust, you might have printed logging messages
by using the println! macro:
fn main() {
    println!("foobar");
}
However, for more complex projects, Rust provides an elegant logging
system that allows log messages from app code and dependencies with
different levels, timestamps, and metadata.
To use this system, add the log crate to your Cargo.toml file:
[package]
name = "app"
version = "0.1.0"
edition = "2021"

[dependencies]
log = "0.4"
Now you can use a number of logging macros: error!, warn!,
info!, debug! and trace! where error! represents the
highest-priority log.
However, you will notice it doesn't actually print anything when you
run this! This is because log expects you to bring your own logger.
There are many available implementations to choose from, here are some
of the most popular ones:
The Tauri team maintains a logger that is built explicitly for Tauri
applications. It is built on top of fern and supports writing logs
to many different targets and consuming log messages produced in the
WebView.
use tauri_plugin_log::{LogTarget, LoggerBuilder};

fn main() {
    tauri::Builder::default()
        .plugin(
            LoggerBuilder::new()
                .targets([
                    // write to the OS logs folder
                    LogTarget::LogDir,
                    // write to stdout
                    LogTarget::Stdout,
                    // forward logs to the webview
                    LogTarget::Webview,
                ])
                .build(),
        )
        .run(tauri::generate_context!())
        .expect("error while running tauri application");
}
Listing 2-TODO: Example configuration that emits logs to the WebView, Stdout and to the OS's log folder.
Sometimes simple logs are not enough to debug your problem, though, so
you might reach for the tracing crate.
In addition to logging-style diagnostics recorded by the log
crate, it provides information about temporality and causality.
Spans in tracing are events that have a beginning and end time, may
be entered and exited by the flow of execution, and may exist within a
nested tree of similar spans.
#![allow(unused)]
fn main() {
use tracing::{info, debug, span, Level};

// records an event outside of any span context:
info!("something happened");

let span = span!(Level::INFO, "my_span");
let _guard = span.enter();

// records an event within "my_span".
debug!("something happened inside my_span");
}
The GNU Project Debugger (GDB) is a very old program written by
Richard Stallman in 1986. GDB has support for several languages, such
as C/C++, but also modern languages such as Go and Rust.
rust-gdb comes with the Rust installation by default and is a
wrapper around GDB that enables pretty-printing rust types in the GDB
output.
LLDB is a debugger built on top of LLVM, the compiler backend used
by Rust itself. We can use the rust-lldb tool, which comes with the
Rust installation by default. It wraps LLDB to provide
pretty-printing rust types.
When your Rust code runs into a problem that is so severe that it
can't recover from it, your program should panic. When a Panic
occurs, your program will print a failure message, unwind and clean up
the stack, and then quit. A Panic will manifest as a hard crash, so
it's crucial to minimize the number of panics.
To determine what caused the Panic, you can re-run your application
with the RUST_BACKTRACE environment variable set to 1 to print a
more detailed failure message.
To open the WebView dev tools, right-click in the WebView and choose
Inspect Element. This opens up the web-inspector similar to the one
you're used to from Chrome, Firefox, or Safari.
If you run into problems with your frontend framework, you might reach
for framework-specific dev tools. While many of them are distributed
as Chromium Extensions, which are not compatible with Tauri,
some of them - such as the Vue Devtools - provide standalone
versions that work nicely with Tauri.
As an alternative to the ubiquitous console.log debugging,
tauri-plugin-log offers a JavaScript API that has a very similar
feature set to the Rust version. You can install it from npm with
the following command:
npm
npm install --save-dev tauri-plugin-log-api
yarn
yarn add -D tauri-plugin-log-api
pnpm
pnpm add -D tauri-plugin-log-api
Now you can emit logs using the trace(), debug(), info(),
warn() and error() functions and attach the devtools console to
the loggers event stream by calling attachConsole():
import {
  attachConsole,
  trace,
  debug,
  info,
  warn,
  error,
} from "tauri-plugin-log-api";

// with LogTarget::Webview enabled this function will print logs to the browser console
const detach = await attachConsole();

trace("A trace-level message");
debug("A debug-level message");
info("An info-level message");
warn("A warn-level message");
error("An error-level message");

// detach the webview console from the log stream
detach();
tauri-plugin-log can be used in production code too. When
configured with the LogTarget::LogDir it will write logs to the
canonical log-file directory of your Operating System. When your
application crashes, you can recover logs from those locations, e.g.,
the Console application can be used to view log files on macOS:
Automated tests are essential to ensure your application's stability,
quality, and correctness. It's common to write Tests for libraries or
server-side code, but many people struggle with writing automated
tests for Graphical User Interface (GUI) applications. Following
the separation of concerns you learned about in the Process Model
chapter, we recommend you set up two kinds of tests:
Unit Tests - Test frontend and Core functionality independently
in isolated contexts.
End-to-End Tests (E2E) - Spiin up full instances of your app and
simulate real user interactions to make sure individually tested
components work well together.
In this guide we walk you through setting up units tests for Rust and
JavaScript, as well as End-to-End tests using WebDriver.
Unit tests verify that individual units of source code are functioning
as expected. This usually doesn't include UI (see
End-to-end Tests for that) but small chunks of
internal logic, for example individual functions or methods.
Cargo comes with a builtin test runner - cargo test - that will run
unit tests and report passes and failures. The simplest test in rust
is a function with the test attribute. To change a plain function
into a test, add #[test] to the line before fn.
Since it's common to write many small tests to ensure different
expectations, Rust unit tests are commonly grouped into Test
Modules:
A simplified Rust test suite containing two very basic tests.
The #[cfg(test)] attribute ensures that the module is only compiled
when running cargo test but stripped when you build the binary for
development or release. To learn more, see the Conditional
Compilation reference.
The function body uses the assert_eq! macro to assert that 2 + 2
equals 4 and 4 + 4 equals 8.
Unit tests in JavaScript are more complicated, as there are many
competing test runners: Jest, Mocha, and Vitest are popular
choices. For the following code-snippets we will be using Vitest.
Contrary to Rust, where tests co-located with the source code (i.e. in
the same file), JavaScript tests are written in a separate file,
commonly named *.tests.js.
Filename: tests/main.test.ts
import { expect, test } from "vitest";
import { foo } from "./main";

test("foo", () => {
  const data = foo();
  expect(data).toEqual("foo");
});
A simplified vitest test suite containing one very basic test.
As your tests are executed in an Isolated Context, you need to
mock Tauri APIs. See Mocking Tauri APIs for
more details.
A popular convention is to add a test script to your package.json
file, so users immediately know how to test your application. Let's
add a test script to our example application that just alises to the
vitest test runner:
End-to-end Tests (E2E) tests simulate a user’s step-by-step
experience, testing the interactions between many components in the
process.
WebDriver is a standardized interface to interact with web documents
primarily intended for automated testing. It provides capabilities for
navigating to web pages, user input, JavaScript execution, and more.
Tauri supports the WebDriver interface by leveraging the native
platform's WebDriver server underneath a cross-platform wrapper
provided by tauri-driver.
Install the latest tauri-driver or update an existing installation by
running:
cargo install tauri-driver
Because we currently utilize the platform's native WebDriver server,
there are some requirements for running tauri-driver on supported
platforms. Platform support is currently limited to Linux and Windows.
We use WebKitWebDriver on Linux platforms. Check if this binary
exists already (command which WebKitWebDriver) as some distributions
bundle it with the regular WebKit package. Other platforms may have a
separate package for them, such as webkit2gtk-driver on Debian-based
distributions.
Make sure to grab the version of Microsoft Edge Driver that matches
your Windows' Edge version that the application is being built and
tested on. This should almost always be the latest stable version on
up-to-date Windows installs. If the two versions do not match, you may
experience your WebDriver testing suite hanging while trying to
connect.
The download contains a binary called msedgedriver.exe.
tauri-driver looks for that binary in the $PATH so make sure
it's either available on the path or use the --native-driver option on
tauri-driver. You may want to download this automatically as part
of the CI setup process to ensure the Edge, and Edge Driver versions
stay in sync on Windows CI machines. A guide on how to do this may be
added at a later date.
WebdriverIO (WDIO) is a test automation framework that provides a
Node.js package for testing with WebDriver. Its ecosystem also
includes various plugins (e.g. reporter and services) that can help
you put together your test setup.
Update the wdio.conf.js file with the following options:
// keep track of the `tauri-driver` child process
let tauriDriver;

exports.config = {
  // ...
  // ensure the rust project is built
  // since we expect this binary to exist
  // for the webdriver sessions
  onPrepare: () => spawnSync("cargo", ["build", "--release"]),

  // ensure we are running `tauri-driver` before the session starts
  // so that we can proxy the webdriver requests
  beforeSession: () =>
    (tauriDriver = spawn(
      path.resolve(os.homedir(), ".cargo", "bin", "tauri-driver"),
      [],
      { stdio: [null, process.stdout, process.stderr] }
    )),

  // clean up the `tauri-driver` process we spawned
  afterSession: () => tauriDriver.kill(),
  // ...
};
Example WebdriverIO config that launches a Tauri app before tests are run and kills the app after all tests finished.
Let's add a test file and a couple e2e tests to show what WDIO is
capabable of. The test runner will load these files and autimatically
run them.
Filename: test/specs/example.e2e.js
// calculates the luma from a hex color `#abcdef`
function luma(hex) {
  if (hex.startsWith("#")) {
    hex = hex.substring(1);
  }

  const rgb = parseInt(hex, 16);
  const r = (rgb >> 16) & 0xff;
  const g = (rgb >> 8) & 0xff;
  const b = (rgb >> 0) & 0xff;
  return 0.2126 * r + 0.7152 * g + 0.0722 * b;
}

describe("Hello Tauri", () => {
  it("should be cordial", async () => {
    const header = await $("body > h1");
    const text = await header.getText();

    expect(text).toMatch(/^[hH]ello/);
  });

  it("should be excited", async () => {
    const header = await $("body > h1");
    const text = await header.getText();

    expect(text).toMatch(/!$/);
  });

  it("should be easy on the eyes", async () => {
    const body = await $("body");
    const backgroundColor = await body.getCSSProperty(
      "background-color"
    );

    expect(luma(backgroundColor.parsed.hex)).toBeLessThan(100);
  });
});
Listing 2-TODO: An example test suite using WebdriverIO that asserts various DOM properties.
The luma function on top is just a helper function for one of our
tests and is not related to the actual testing of the application. If
you are familiar with other testing frameworks, you may notice similar
functions being exposed that are used, such as describe, it, and
expect. The other APIs, such as items like $ and its exposed
methods, are covered by the WebdriverIO API docs.
To run your test suite, open a terminal and execute the following
command:
npm
npx wdio run wdio.conf.json
yarn
yarn wdio run wdio.conf.json
pnpm
pnpm wdio run wdio.conf.json
You should see the following output:
➜  webdriverio git:(main) ✗ yarn test
yarn run v1.22.11
$ wdio run wdio.conf.js

Execution of 1 workers started at 2021-08-17T08:06:10.279Z

[0-0] RUNNING in undefined - /test/specs/example.e2e.js
[0-0] PASSED in undefined - /test/specs/example.e2e.js

 "spec" Reporter:
------------------------------------------------------------------
[wry 0.12.1 linux #0-0] Running: wry (v0.12.1) on linux
[wry 0.12.1 linux #0-0] Session ID: 81e0107b-4d38-4eed-9b10-ee80ca47bb83
[wry 0.12.1 linux #0-0]
[wry 0.12.1 linux #0-0] » /test/specs/example.e2e.js
[wry 0.12.1 linux #0-0] Hello Tauri
[wry 0.12.1 linux #0-0]    ✓ should be cordial
[wry 0.12.1 linux #0-0]    ✓ should be excited
[wry 0.12.1 linux #0-0]    ✓ should be easy on the eyes
[wry 0.12.1 linux #0-0]
[wry 0.12.1 linux #0-0] 3 passing (244ms)
Listing 2-TODO: Example output from WebdriverIO showing the 3 tests from earlier passing.
Selenium is a web automation framework that exposes bindings to
WebDriver APIs in many languages. Their Node.js bindings are available
under the selenium-webdriver package on NPM. Unlike the WebdriverIO
Test Suite, Selenium does not come out of the box with a Test Suite
and leaves it up to the developer to provide one. We chose Mocha for
this example, since it's a popular choice.
The following code will start an instance of your app before tests are
run and ensure the instance is terminated afterwards. Let's add it to
the default mocha testing file:
Filename: test/test.js
const os = require("os");
const path = require("path");
const { spawn, spawnSync } = require("child_process");
const { Builder, By, Capabilities } = require("selenium-webdriver");

// create the path to the expected application binary
const application = path.resolve(
  __dirname,
  "..",
  "..",
  "..",
  "target",
  "release",
  "hello-tauri-webdriver"
);

// keep track of the webdriver instance we create
let driver;

// keep track of the tauri-driver process we start
let tauriDriver;

before(async function () {
  // set timeout to 2 minutes
  // to allow the program to build if it needs to
  this.timeout(120000);

  // ensure the program has been built
  spawnSync("cargo", ["build", "--release"]);

  // start tauri-driver
  tauriDriver = spawn(
    path.resolve(os.homedir(), ".cargo", "bin", "tauri-driver"),
    [],
    { stdio: [null, process.stdout, process.stderr] }
  );

  const capabilities = new Capabilities();
  capabilities.set("tauri:options", { application });
  capabilities.setBrowserName("wry");

  // start the webdriver client
  driver = await new Builder()
    .withCapabilities(capabilities)
    .usingServer("http://localhost:4444/")
    .build();
});

after(async function () {
  // stop the webdriver session
  await driver.quit();

  // kill the tauri-driver process
  tauriDriver.kill();
});
Listing 2-TODO: Example Selenium file that launches a Tauri app before tests are run and kills the app after all tests finished.
Now we can add tests to the file we created earlier. We will be using
assertion functions provided by Chai such as expect to validate
our app works as expected.
Filename: test/test.js
const { expect } = require("chai");

describe("Hello Tauri", () => {
  it("should be cordial", async () => {
    const text = await driver
      .findElement(By.css("body > h1"))
      .getText();

    expect(text).to.match(/^[hH]ello/);
  });

  it("should be excited", async () => {
    const text = await driver
      .findElement(By.css("body > h1"))
      .getText();

    expect(text).to.match(/!$/);
  });

  it("should be easy on the eyes", async () => {
    // selenium returns color css values as rgb(r, g, b)
    const text = await driver
      .findElement(By.css("body"))
      .getCssValue("background-color");

    const rgb = text.match(
      /^rgb\((?<r>\d+), (?<g>\d+), (?<b>\d+)\)$/
    ).groups;

    expect(rgb).to.have.all.keys("r", "g", "b");

    const luma = 0.2126 * rgb.r + 0.7152 * rgb.g + 0.0722 * rgb.b;
    expect(luma).to.be.lessThan(100);
  });
});
Listing 2-TODO: Example tests using Selenium and Chai to assert various DOM properties.
If you are familiar with JS testing frameworks, describe, it, and
expect should look familiar. We also have semi-complex before()
and after() callbacks to setup and teardown mocha. If you compare
this to the WebdriverIO example, you notice a lot
more code that isn't tests, as we have to set up a few more WebDriver
related items.
To run your test suite, open a terminal and execute the following
command:
npm
npx mocha
yarn
yarn mocha
pnpm
pnpm mocha
We should see output the following output:
➜  selenium git:(main) ✗ yarn test
yarn run v1.22.11
$ Mocha


  Hello Tauri
    ✔ should be cordial (120ms)
    ✔ should be excited
    ✔ should be easy on the eyes


  3 passing (588ms)

Done in 0.93s.
Listing 2-TODO: Output from Selenium showing the 3 earlier tests passing.
When writing your frontend tests, having a "fake" Tauri environment to
simulate windows or intercept IPC calls is common, so-called
mocking. The @tauri-apps/api/mocks module provides some helpful
tools to make this easier for you:
Remember to clear mocks after each test run to undo mock state
changes between runs! See clearMocks() docs for more info.
Most commonly, you want to intercept IPC requests; this can be helpful
in a variety of situations:
Ensure the correct backend calls are made
Simulate different results from backend functions
Tauri provides the mockIPC function to intercept IPC requests. You can
find more about the specific API in detail here.
The following examples use Vitest, but you can use any other
frontend testing library such as jest.
import { beforeAll, expect, test } from "vitest";
import { randomFillSync } from "crypto";

import { mockIPC } from "@tauri-apps/api/mocks";
import { invoke } from "@tauri-apps/api/tauri";

// jsdom doesn't come with a WebCrypto implementation
beforeAll(() => {
  window.crypto = {
    getRandomValues: function (buffer) {
      return randomFillSync(buffer);
    },
  };
});

test("invoke simple", async () => {
  mockIPC((cmd, args) => {
    // simulate rust command called "add"
    if (cmd === "add") {
      return args.a + args.b;
    }
  });

  expect(invoke("add", { a: 12, b: 15 })).resolves.toBe(27);
});
Listing 2-TODO: Vitest test file showing a mocked command handler that simulates a simple add function.
Sometimes you want to track more information about an IPC call; how
many times was the command invoked? Was it invoked at all? You can use
mockIPC() with other spying and mocking tools to test this:
import { beforeAll, expect, test, vi } from "vitest";
import { randomFillSync } from "crypto";

import { mockIPC } from "@tauri-apps/api/mocks";
import { invoke } from "@tauri-apps/api/tauri";

// jsdom doesn't come with a WebCrypto implementation
beforeAll(() => {
  //@ts-ignore
  window.crypto = {
    getRandomValues: function (buffer) {
      return randomFillSync(buffer);
    },
  };
});

test("invoke", async () => {
  mockIPC((cmd, args) => {
    // simulate rust command called "add"
    if (cmd === "add") {
      return args.a + args.b;
    }
  });

  // we can use the spying tools provided by vitest
  // to track the mocked function
  const spy = vi.spyOn(window, "__TAURI_IPC__");

  expect(invoke("add", { a: 12, b: 15 })).resolves.toBe(27);
  expect(spy).toHaveBeenCalled();
});
Listing 2-TODO: The mocked __TAURI_IPC__ is compatible with existing
testing tools.
Sometimes you have window-specific code (a splash screen window, for
example), so you need to simulate different windows. You can use the
mockWindows() method to create fake window labels. The first
string identifies the "current" window (i.e., the window your
JavaScript believes itself in), and all other strings are treated as
additional windows.
mockWindows() only fakes the existence of windows but no window
properties. To simulate window properties, you need to intercept the
correct calls using mockIPC()
import { beforeAll, expect, test } from "vitest";
import { randomFillSync } from "crypto";

import { mockWindows } from "@tauri-apps/api/mocks";

// jsdom doesn't come with a WebCrypto implementation
beforeAll(() => {
  //@ts-ignore
  window.crypto = {
    getRandomValues: function (buffer) {
      return randomFillSync(buffer);
    },
  };
});

test("invoke", async () => {
  mockWindows("main", "second", "third");

  const { getCurrent, getAll } = await import(
    "@tauri-apps/api/window"
  );

  expect(getCurrent()).toHaveProperty("label", "main");
  expect(getAll().map((w) => w.label)).toEqual([
    "main",
    "second",
    "third",
  ]);
});
Listing 2-TODO: A vitest test file with 3 mocked windows.
Tauri allows you to create cross-platform applications from a single
codebase with ease. This, however, doesn't mean you can just
package a Website with Tauri and be good to go. Your end-users may run
a number of Operating Systems (OS) on a wide variety of hardware. And
they all expect your app to run well on their machine, "feel native"
and integrate with OS features.
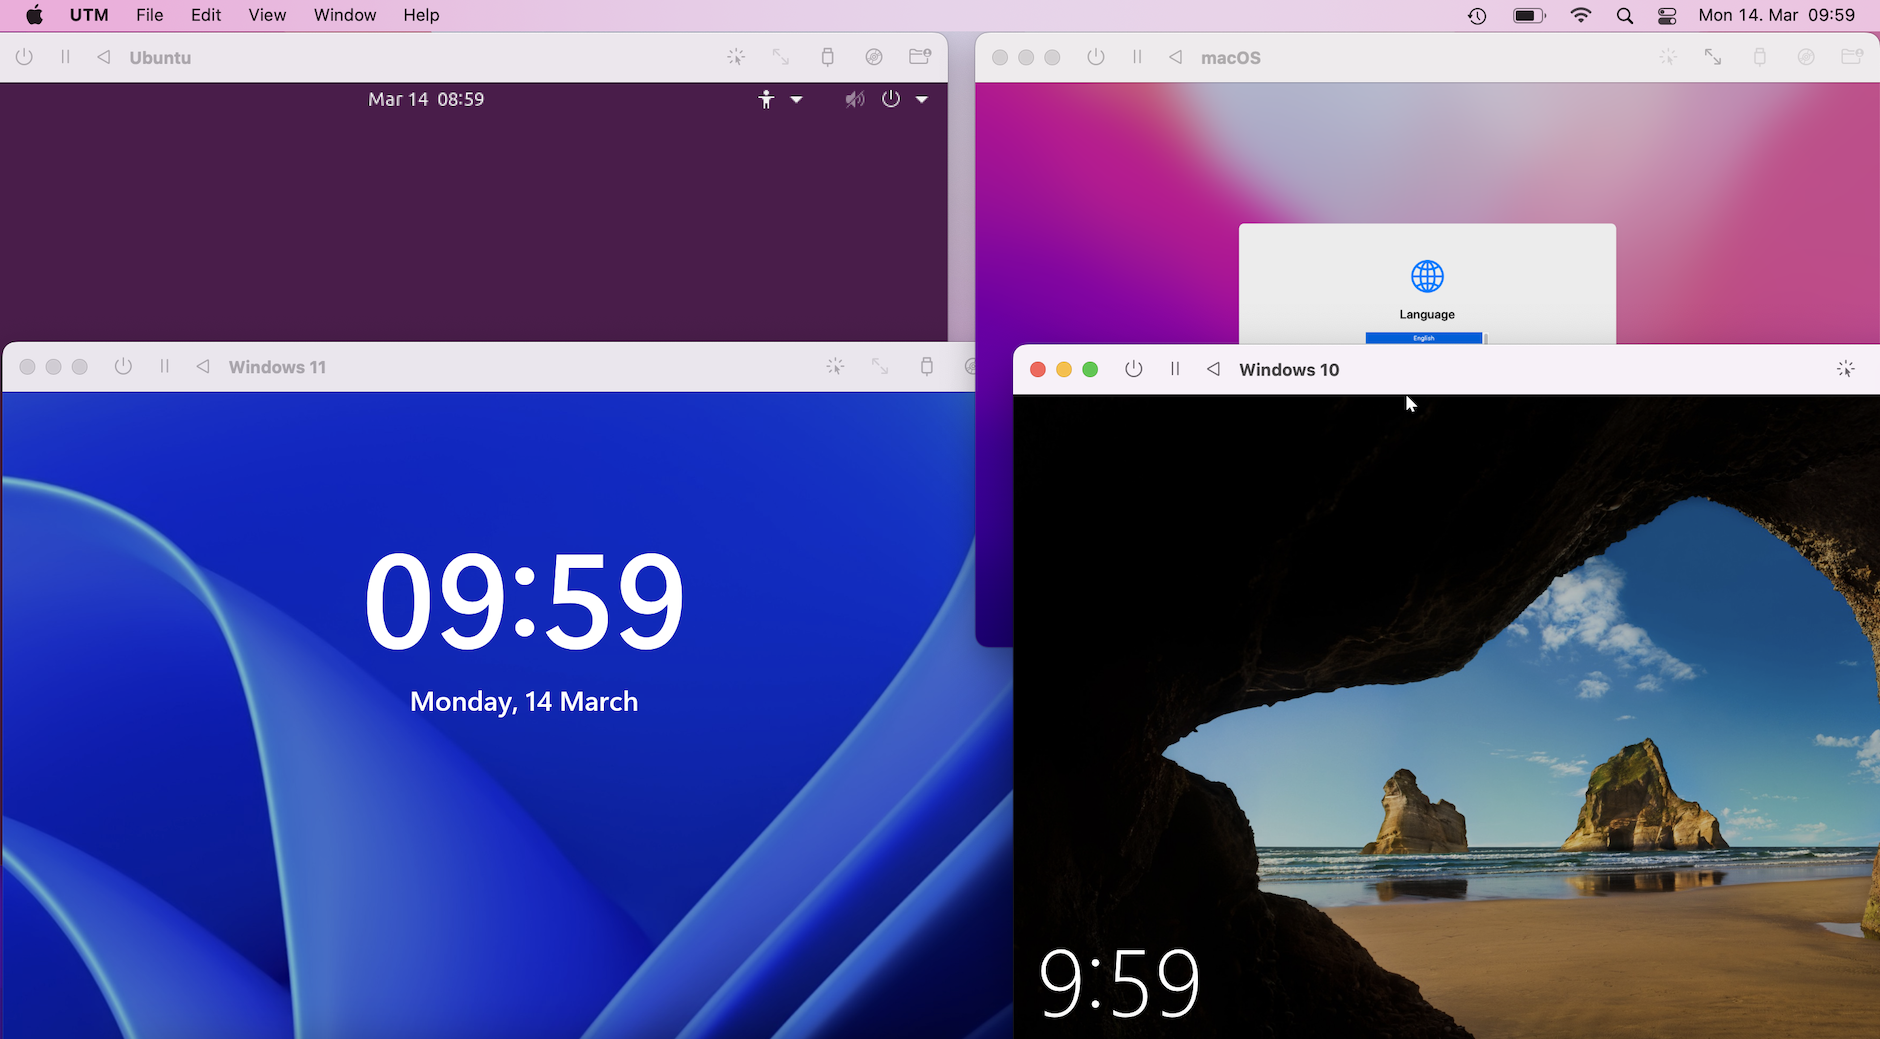
Here is where Virtual Machines (VMs) come into play: They can simulate
a variety of CPU architectures, Peripherals and run any Operating
System right from the convenience of your main development machine.
This allows you to switch between different Operating Systems very
quickly, to test and develop features and them.
The following picture shows a Windows 10, Windows 11, Ubuntu and macOS
VM running inside a macOS host through UTM a VM software for macOS.
Listing 2-TODO: Windows 10, Windows 11, Ubuntu and macOS VMs running inside a macOS host through [UTM] a VM software for macOS.
There are many Virtual Machine Solutions available; most of them are
free and Open-Source with some paid solutions. And since giving
detailed guides for each would blow the scope of this document, we
give you a shortlist of popular projects below and invite you to read
their respective documentation for more details.
VirtualBox Popular open-source VM software
developed by Oracle.
VMware Paid VM software for Windows with a
feature-limited free version.
Hyper-V Hardware virtualization technology built into
Windows itself.
QEMU Open-source virtualization and emulation software
predominantly on Linux and macOS.
UTM Easy to use virtualization and emulation on macOS
using Apple Silicon features to run at near native speeds. Uses QEMU
under the hood.
The Tauri bundler is part of the Tauri CLI and lets you compile your
binary, package assets, and prepare a final bundle with a single
command:
tauri build
Like the tauri dev command, the first time you run this, it takes
some time to collect the Rust crates and build everything - but on
subsequent runs, it only needs to rebuild your app's code, which is
much quicker. Besides compiling the Rust project, the tauri build
command does several other things for you:
Build the Frontend
If you have configured your tauri.conf.json correctly, the
bundler calls the beforeBuildCommand during this step,
allowing you to build your Frontend.
Build the Rust Binary
The bundler calls cargo build under the hood and compile the Rust
project into a single executable. This step also inlines your
previously generated Frontend files into the executable. The
compiled executable is placed in the src-tauri/target/release
folder.
Create Packages
During this step the bundler collects all necessary files for
packaging: the binary, resources, sidecars, icons and app
manifests. These files will be packaged up according to the package
formats your operating system supports. The created artifacts are
located in the src-tauri/target/release/bundle/ folder.
Code Sign
If you have code-signing enabled, either for
Windows, macOS, or
the Updater, the last step is signing the
created artifacts. This step will create .sig files in the
src-tauri/target/release/bundle/ for each supported packaging
format.
Resources are configured by the tauri.bundle.resources property
and are a convenient way to include files or folders that should not
be inlined into the executable but kept on the filesystem. A common
use case is supporting files for sidecars or images or videos.
Cross-platform compilation is not supported at this moment. If you
want to produce binaries for all three operating systems, you can use
Virtual Machines or a CI service like GitHub Actions.
Tauri applications for Linux are distributed either as Debian
Packages (.deb) or AppImages
(.AppImage). This guides provides information about format specific
quirks and customization opportunities.
AppImage is a distribution format that does not rely on the system
installed packages and instead bundles all dependencies and files
needed by the application. For this reason, the output file is larger
but easier to distribute since it is supported on many Linux
distributions and can be executed without installation, just making
the file executable (chmod a+x MyProject.AppImage) and running it
(./MyProject.AppImage).
AppImages are convenient, simplifying the distribution process if you
cannot make a package targeting the distribution's package manager.
Still, you should carefully use it as the file size grows from the
2-6MBs range to 70+MBs.
Debian packages are a compressed collection of files installed on
various Linux distributions. Unlike AppImages they don't bundle
required libraries, relying instead on the correct dependency versions
installed on the system. This makes them less portable and reliable
since missing libraries or incompatible versions will cause problems.
Debian packages are recommended only for distributions that have no
support for AppImages.
Instead of launching the app directly, you can configure the bundled
app to run a script that tries to expose the environment variables to
the app; without that, you'll have trouble using system programs
because the PATH environment variable isn't correct. You can enable
it with the tauri.bundle.deb.useBootstrapper config.
Tauri applications for Windows are distributed as Microsoft Installer
(.msi files). The Tauri CLI bundles your application binary and
additional resources in this format if you build on windows. This
guide provides information about available customization options for
the installer.
The Tauri CLI compiles your executable using your machine's
architecture by default. Assuming that you're developing on a 64-bit
machine, the CLI will produce 64-bit applications. If you need to
support 32-bit machines, you can compile your application with a
different Rust target using the --target flag:
tauri build --target i686-pc-windows-msvc
Listing 3-TODO: Building a Tauri application for 32-bit windows.
By default Rust only installs toolschains for your machine's target,
so you need to install the 32-bit Windows toolchain first:
rustup target add i686-pc-windows-msvc. You can get a full list of
Rust targets by running rustup target list.
By default, the Tauri installer downloads and installs the Webview2
Runtime if it is not already installed (On Windows 11, WebView2 is
preinstalled).
You can remove the Webview2 Runtime download check from the
installer by setting tauri.bundle.windows.wix.skipWebviewInstall
to true. Your application WON'T work if the user does not have the
runtime installed.
Using a global installation of WebView2 is great for security as
Window keeps it updated, but if your end-users have no internet
connection or you need a particular version of WebView2, Tauri can
bundle the runtime files for you. Keep in mind, that this increases
the size of windows installers by 150MB since your app will
include its own copy of chromium.
Download the Webview2 fixed version runtime from the official
website, a .cab file for the
selected architecture. In this example, the downloaded filename is
Microsoft.WebView2.FixedVersionRuntime.98.0.1108.50.x64.cab
Extract the file to the core folder: Expand .\Microsoft.WebView2.FixedVersionRuntime.98.0.1108.50.x64.cab -F:* ./src-tauri
Configure the Webview2 runtime path on tauri.conf.json:
The Windows Installer package is built using the WiX Toolset v3.
Currently, you can change it by using a custom WiX source code (an XML
file with a .wxs file extension) or through WiX fragments.
The Windows Installer XML defined by Tauri is configured to work for
the common use case of simple webview-based applications; you can find
it here. It uses handlebars so the Tauri CLI
can brand your installer according to your tauri.conf.json
definition. If you need a completely different installer, a custom
template file can be configured on
tauri.bundle.windows.wix.template.
A WiX fragment is a container where you can configure almost
everything offered by WiX. In this example, we will define a fragment
that writes two registry entries:
<?xml version="1.0" encoding="utf-8"?>
<Wix xmlns="http://schemas.microsoft.com/wix/2006/wi">
  <Fragment>
    <!-- these registry entries should be installed
		 to the target user's machine -->
    <DirectoryRef Id="TARGETDIR">
      <!-- groups together the registry entries to be installed -->
      <!-- Note the unique `Id` we provide here -->
      <Component Id="MyFragmentRegistryEntries" Guid="*">
        <!-- the registry key will be under
			 HKEY_CURRENT_USER\Software\MyCompany\MyApplicationName -->
        <!-- Tauri uses the second portion of the
			 bundle identifier as the `MyCompany` name
			 (e.g. `tauri-apps` in `com.tauri-apps.test`)  -->
        <RegistryKey
          Root="HKCU"
          Key="Software\MyCompany\MyApplicationName"
          Action="createAndRemoveOnUninstall"
        >
          <!-- values to persist on the registry -->
          <RegistryValue
            Type="integer"
            Name="SomeIntegerValue"
            Value="1"
            KeyPath="yes"
          />
          <RegistryValue Type="string" Value="Default Value" />
        </RegistryKey>
      </Component>
    </DirectoryRef>
  </Fragment>
</Wix>
Save the fragment file with the .wxs extension somewhere in your
project and reference it on tauri.conf.json:
Note that ComponentGroup, Component, FeatureGroup, Feature and
Merge element ids must be referenced on the wix object of
tauri.conf.json on the componentGroupRefs, componentRefs,
featureGroupRefs, featureRefs and mergeRefs respectively in
order to be included on the installer.
The Windows Installer is built using the en-US language by default.
Internationalization (i18n) can be configured using the
tauri.bundle.windows.wix.language property, defining the languages
Tauri should build an installer against. You can find the language
names to use in the Language-Culture column
here.
To compile an installer targeting a list of languages, use an array. A
specific installer for each language will be created, with the
language key as a suffix:
The localePath property defines the path to a language file, a XML
configuring the language culture:
<WixLocalization
  Culture="en-US"
  xmlns="http://schemas.microsoft.com/wix/2006/localization"
>
  <String Id="LaunchApp"> Launch MyApplicationName </String>
  <String Id="DowngradeErrorMessage">
    A newer version of MyApplicationName is already installed.
  </String>
  <String Id="PathEnvVarFeature">
    Add the install location of the MyApplicationName executable to
    the PATH system environment variable. This allows the
    MyApplicationName executable to be called from any location.
  </String>
  <String Id="InstallAppFeature">
    Installs MyApplicationName.
  </String>
</WixLocalization>
The WixLocalization element's Culture field must match the
configured language.
Currently Tauri references the following locale strings: LaunchApp,
DowngradeErrorMessage, PathEnvVarFeature and InstallAppFeature.
You can define your own strings and reference them on your custom
template or fragments with "!(loc.TheStringId)". See the WiX
localization documentation for more information.
Tauri applications for macOS are distributed either with an
Application Bundle (.app files) or an Apple Disk Image (.dmg
files). The Tauri CLI automatically bundles your application code in
these formats, providing options to codesign and notarize your
application.
The minimum version of the operating system required for a Tauri app
to run in macOS is 10.13. If you need support for newer macOS APIs
like window.print that is only supported from macOS version 11.0
onwards, you can change the
tauri.bundle.macOS.minimumSystemVersion. This will in turn set the
Info.plistLSMinimumSystemVersion property and the
MACOSX_DEPLOYMENT_TARGET environment variable.
Note: macOS High Sierra (10.13) no longer receives security updates
from Apple. You should target macOS Catalina (10.15) if possible.
macOS applications can target Apple Silicon, Intel-based Mac
computers, or universal macOS binaries that work on both
architectures. By default, the Tauri CLI uses your machine's
architecture, but you can configure a different target using the
--target flag:
tauri build --target aarch64-apple-darwin
Supported targets are:
aarch64-apple-darwin - Apple silicon, also known as m1 Macs, for
all models introduced after late 2020.
x86_64-apple-darwin - Intel-based Macs, all Macs introduced before
fall 2020.
universal-apple-darwin - produces a Universal macOS Binary that
runs on both Apple silicon and Intel-based Macs.
While Apple silicon machines can run applications compiled for
Intel-based Macs through a translation layer called Rosetta, they
tend to suffer from performance problems. It is common practice to let
the user choose the correct target when downloading the app, but you
can also choose to distribute a Universal
Binary. Universal Binaries include both
aarch64andx86_64 executables, giving you the best experience
on both architectures. Note, however, that this increases your bundle
size significantly.
The Tauri configuration file provides the following options to
customize your application bundle:
Bundle name - Your apps human-readable name. Configured by the
package.productName property.
Bundle version - Your apps version. Configured by the
package.version property.
Application category - The category that describes your app.
Configured by the tauri.bundle.category property. You can see a
list of macOS categories here.
Copyright - A copyright string associated with your app.
Configured by the tauri.bundle.copyright property.
Bundle icon - Your apps icon. Uses the first .icns file listed
on the tauri.bundle.icon array.
Exception domain - an insecure domain that your application can
access such as a localhost or a remote http domain. It is a
convenience configuration around
NSAppTransportSecurity > NSExceptionDomains setting
NSExceptionAllowsInsecureHTTPLoads and NSIncludesSubdomains to
true. See tauri.bundle.macOS.exceptionDomain.
Bootstrapper - Instead of launching the app directly, you can
configure the bundled app to run a script that tries to expose the
environment variables to the app; without that, you'll have trouble
using system programs because the PATH environment variable isn't
correct. Enable it with tauri.bundle.macOS.useBootstrapper.
These options generate the application bundle Info.plist file. You
can extend the generated file with your own Info.plist file stored
on the Tauri folder (src-tauri by default). The CLI merges both
.plist files on production, and the core layer embeds it on the
binary on development.
The Tauri bundler automatically generates update artifacts if the
updater is enabled in tauri.conf.json Your update artifacts are
automatically signed if the bundler can locate your private and public
key.
The signature can be found in the sig file. The signature can be
uploaded to GitHub safely or made public if your private key is
secure.
With Tauri, we are working to reduce the environmental footprint of
applications by using system resources where available, providing
compiled systems that don't need runtime evaluation, and offering
guides so that engineers can go even smaller without sacrificing
performance or security. The point is, by saving resources, we are
doing our part to help you help us save the planet -- which is the
only bottom line that companies in the 21st Century should care about.
So if you are interested in learning how to improve your app size and
performance, read on!
Before you can optimize your app, you need to figure out what takes up
space in your app! Here are a couple of tools that can assist you with
that:
cargo-bloat - A rust utility to determine what takes the most
space in your app. It gives you an excellent, sorted overview of the
most significant rust functions.
cargo-expand - Macros make your rust code more concise and
easier to read, but they are also hidden size traps! Use
cargo-expand to see what those macros generate
under the hood.
rollup-plugin-visualizer - A tool that generates beautiful
(and insightful) graphs from your rollup bundle. Very convenient for
figuring out what JavaScript dependencies contribute to your final
bundle size the most.
rollup-plugin-graph - You noticed a dependency included in
your final frontend bundle, but you are unsure why?
rollup-plugin-graph generates graphviz
compatible visualizations of your entire dependency graph.
These are just a couple of tools that you might use. Make sure to
check your frontend bundlers plugin list for more!
You can choose among a plethora of JavaScript bundlers; popular
choices are Vite, webpack, and rollup. All of them can produce
minified JavaScript if configured correctly, so please consult your
bundler documentation for specific options. Generally speaking;
however, you should make sure to:
Enable tree shaking
This option removes unused JavaScript from your bundle. All popular
bundlers enable this by default.
Enable minification
Minification removes unnecessary whitespace, shortens variable
names, and applies other optimizations. Most bundlers enable this by
default; a notable exception is rollup, where you need plugins
like rollup-plugin-terser or rollup-plugin-uglify.
Note: You can use minifiers like terser and esbuild as
standalone tools.
Disable source maps
Source maps provide a pleasant developer experience when working
with languages that compile to JavaScript, such as TypeScript. As
source maps tend to be quite large, you must disable them when
building for production. They have no benefit to your end-user, so
it's effectively dead weight.
Most libraries you use depend on many libraries themselves, so a
library that looks inconspicuous at first glance might add several
megabytes worth of code to your app.
You can use Bundlephobia to find the cost of JavaScript
dependencies. Inspecting the cost of rust dependencies is generally
harder since the compiler does many optimizations.
If you find a library that seems excessively large, google around,
chances are someone else already had the same thought and created an
alternative. A good example is Moment.js and it's Many
alternatives.
But keep in mind: The best dependency is no dependency, meaning
that you should always prefer language builtins over 3rd party
packages.
Formats such as webp or avif offer size reductions of up to
95% compared to jpeg while maintaining excellent visual accuracy.
You can use tools such as Squoosh to try different formats on your
images.
Size images accordingly
No one appreciates you shipping the 6K raw image with your app, so
make sure to size your image accordingly. Images that appear large
on-screen should be sized larger than images that take up less
screen space.
Don't use Responsive Images
In a Web Environment, you are supposed to use Responsive Images to
load the correct image size for each user dynamically. You are not
building a simple website, though: All your images are already
downloaded. So using Responsive Images only bloat your app with
redundant copies.
Remove Metadata
Images that were taken straight from a camera or stock photo side
often include metadata about the Camera and Lens model or
Photographer. Not only are those wasted bytes, but metadata
properties can also hold potentially sensitive information such as
the time, day, and location of the photo.
Consider not shipping custom fonts with your app and relying on system
fonts instead. If you must ship custom fonts, make sure they are in
modern, optimized formats such as woff2.
Fonts can be pretty big, so using the fonts already included in the
Operating System reduces the footprint of your app. It also avoids
FOUT (Flash of Unstyled Text) and makes your app feel more "native"
since it uses the same font as all other apps.
If you must include custom fonts, make sure you include them in modern
formats such as woff2 as those tend to be way smaller than legacy
formats.
font-family: Iowan Old Style, Apple Garamond, Baskerville,
  Times New Roman, Droid Serif, Times, Source Serif Pro, serif, Apple
    Color Emoji, Segoe UI Emoji, Segoe UI Symbol;
Monospace
font-family: ui-monospace, SFMono-Regular, SF Mono, Menlo, Consolas,
  Liberation Mono, monospace;
The allowlist config determines what API features to enable;
disabled features will not be compiled into your app. This is an
easy way of shedding some extra weight.
Configure your cargo project to take advantage of rusts size
optimization features. Why is a rust executable large ? provides an
excellent explanation on why this matters and an in-depth walkthrough.
At the same time, Minimizing Rust Binary Size is more up-to-date and
has a couple of extra recommendations.
Cargo exposes several options that determine how the compiler
generates your binary. The "recommended" options for Tauri apps are
these:
[profile.release]
panic = "abort" # Strip expensive panic clean-up logic
codegen-units = 1 # Compile crates one after another so the compiler can optimize better
lto = true # Enables link to optimizations
opt-level = "s" # Optimize for binary size
There is also opt-level = "z" available to reduce the resulting
binary size. "s" and "z" can sometimes be smaller than the
other, so test it with your application!
We've seen smaller binary sizes from "s" for Tauri example
applications, but real-world applications can always differ.
The following suggestions are all unstable features and require a
nightly toolchain. See the Unstable
Features documentation for more
information on what this involves.
The following methods involve using unstable compiler features and
require the rust nightly toolchain. If you don't have the nightly
toolchain + rust-src nightly component added, try the following:
The Rust Standard Library comes precompiled. This means rust is faster
to install, but also that the compiler can't optimize the Standard
Library. You can apply the optimization options for the rest of your
binary + dependencies to the std with an unstable flag. This flag
requires specifying your target, so know the target triple you are
targeting.
If you are using panic = "abort" in your release profile
optimizations, you need to make sure the panic_abort crate is
compiled with std. Additionally, an extra std feature can further
reduce the binary size. The following applies both:
Your compiled app includes so-called "Debug Symbols" that include
function and variable names. Your end-users will probably not care
about Debug Symbols, so this is a pretty surefire way to save some
bytes!
UPX, Ultimate Packer for eXecutables, is a dinosaur amongst the
binary packers. This 23-year old, well-maintained piece of kit is
GPL-v2 licensed with a pretty liberal usage declaration. Our
understanding of the licensing is that you can use it for any purposes
(commercial or otherwise) without needing to change your license
unless you modify the source code of UPX.
Maybe your target audience has very slow internet, or your app needs
to fit on a tiny USB stick, and all the above steps haven't resulted
in the savings you need. Fear not, as we have one last trick up our
sleeves:
UPX compresses your binary and creates a self-extracting executable
that decompresses itself at runtime.
You should know that this technique might flag your binary as a
virus on Windows and macOS - so use at your own discretion, and as
always, validate with Frida and do real distribution testing!
Code signing your application lets users know that they downloaded the
official executable of your app and not some malware that poses as
your app. While it is not required, it improves users' confidence in
your app.
The following list walks you through the necessary steps to code-sign
a Windows application.
Prerequisites
This guide assumes you run Windows, either on a physical machine or
a Virtual Machine and that you already have a working Tauri
application.
Get a Code Signing Certificate
To sign your application, you need to acquire a Code Signing
certificate from one of the supported certificate authorities
like Digicert, Sectigo (formerly Comodo), or Godaddy.
To eliminate all security prompts during installation, you need an
extended validation (EV) code signing certificate. These
certificates cost upwards of 400$ and require a hardware token.
Depending on your country, they might also be sold to companies
only.
Create .pfx Certificate
You need a PKCS 12 Certificate file to sign an executable,
commonly called a PFX file. We will take the certificate file (e.g.
cert.cer) and private key (e.g. private-key.key) you received
from your certificate authority and convert them into a .pfx
file. Open a PowerShell prompt and enter the following
command:
Make sure you don't forget the export password when prompted, we
need it in the next step.
Import Certificate
You now need to import your newly created .pfx certificate into
the Windows Keystore. First, we need to store the export password
you previously created into an environment variable. The securest
option is the Get-Credential helper; Enter the following command
in your PowerShell prompt:
digestAlgorithm - The SHA digest algorithm used for your
certificate. This is likely sha256.
timestampUrl - A URL pointing to a timestamp server used to
verify the time the certificate is signed. It's best to provide
the timestamp server provided by your certificate authority here.
tsp - Enables the Time-Stamp Protocol (TSP, defined by RFC
3161) instead of NTP. Some certificate authorities, like
SSL.com only provide TSP servers.
As the above-described process is rather laborious, most developers
run this step as an automated part of their Continous Integration
(CI). For users of GitHub Actions Tauri provides the Tauri Action,
which simplifies the setup.
Note: The following example assumes you store the secret passwords
and tokens using GitHub Secrets.
This guide provides information on code signing, notarizing and
uploading your app to the Mac App Store.
If you are not utilizing GitHub Actions to perform builds of OSX
DMGs, you will need to ensure the environment variable CI is set
to true. For more information refer to
tauri-apps/tauri#592.
On macOS Catalina and later Gatekeeper enforces that you must sign
and notarize your application. Unsigned software cannot be run, so
contrary to Windows Code Signing this is not optional for macOS.
Prerequisites
This guide assumes you run Windows, either on a physical machine or
a Virtual Machine, and that you already have a working Tauri
application. You also need Xcode 11 or newer and an Apple Developer
account enrolled in the Apple Developer Program.
Get a Code Signing Certificate
To create a new signing certificate, you must generate a
Certificate Signing Request (CSR) file on your Mac computer.
Create a certificate signing request describes guides you through
creating a CSR.
Next, open the Certificates, IDs & Profiles page and click on the
Add button to open the interface to create a new certificate.
Choose the appropriate certificate type (Apple Distribution to
submit apps to the App Store, and Developer ID Application to
ship apps outside the App Store). Upload your CSR, and the
certificate will be created.
Only the Apple Developer Account Holder can create
Developer ID Application certificates. But it can be associated
with a different Apple ID by creating a CSR with a different user
email address.
Downloading the Certificate
On Certificates, IDs & Profiles page, click on the certificate
you want to use and click the Download button. It saves a .cer
file that installs the certificate on the keychain once opened. The
name of the keychain entry represents the signing identity, which
can also be found by running this command:
security find-identity -v -p codesigning.
A signing certificate is only valid if associated with your Apple
ID. An invalid certificate won't be listed on the
Keychain Access > My Certificates tab or the
security find-identity -v -p codesigning output.
Tauri Configuration
To have the Tauri bundler sign your application, you need to
configure it. This is done by setting a number of environment
variables.
APPLE_SIGNING_IDENTITY - this is the signing identity we
highlighted earlier. It must be defined to sign apps both locally
and on CI machines.
Additionally, to simplify the code signing process on CI, Tauri can
automatically install the certificate on the keychain if you define
the APPLE_CERTIFICATE and APPLE_CERTIFICATE_PASSWORD
environment variables.
Open the Keychain Access app and find your certificate's
keychain entry.
Expand the entry, double click on the key item, and select
Export "$KEYNAME".
Select the path to save the .p12 file and define the exported
certificate password.
Convert the .p12 file to base64 running the following script
on the terminal: `
APPLE_ID and APPLE_PASSWORD - to authenticate with your Apple
ID, set the APPLE_ID to your Apple account email (example:
export APPLE_ID=tauri@icloud.com) and the APPLE_PASSWORD to
an app-specific password for the Apple account.
APPLE_API_ISSUER and APPLE_API_KEY - alternatively, you can
authenticate using an App Store Connect API key. Open the
App Store Connect's Users and Access page, click the Add
button and select a name and check Developer Access. The
APPLE_API_ISSUER (Issuer ID) is presented above the keys table,
and the APPLE_API_KEY is the value of the Key ID column of
that table. You also need to download the private key, which can
only be done once and is only visible after a page reload (the
button is shown on the table row for the newly created key). The
private key file must be saved in one of these location
./private_keys, ~/private_keys, ~/.private_keys or
~/.appstoreconnect/private_keys, as stated by
xcrun altool --help.
Sign your Application
Now the Tauri bundler will sign and notarize your application
automatically whenever you run tauri build.
Congratulations! You have successfully signed your Tauri
application!
As the above-described process is rather laborious, most developers
run this step as an automated part of their Continous Integration
(CI). For users of GitHub Actions Tauri provides the Tauri Action,
which simplifies the setup.
Note: The following example assumes you store the secret passwords
and tokens using GitHub Secrets.
If you have tauri.macOSPrivateApi enabled and make use of features
like the transparent background or developer tools in production
builds, your app can't be submitted to the Mac App Store.
Depending on the features you have enabled, you may need to request
additional permissions by creating an entitlements.plist file. Use
the tauri.bundle.macos.entitlements property to include the file
in your final bundle.
The updater is focused on making Tauri's application updates as safe
and transparent as updates to a website.
Instead of publishing a feed of versions from which your app must
select, Tauri updates to the version your server tells it to. This
allows you to intelligently update your clients based on the request
you give to Tauri. The server can remotely drive behaviors like
rolling back or phased rollouts. The update JSON Tauri requests should
be dynamically generated based on criteria in the request and whether
an update is required. Tauri's installer is also designed to be
fault-tolerant, and ensure that any updates installed are valid and
safe.
The required keys are active, endpoints and pubkey; others are
optional. active must be a boolean. By default, it's set to false.
endpoints must be an array. The strings {{current_version}} and
{{target}} and {{arch}} are automatically replaced in the URL,
allowing you to determine server-side if an
update is available. If multiple endpoints are specified, the updater
will fall back if a server is not responding within the pre-defined
timeout. dialog must be a boolean if present. By default, it is set
to true. If enabled, events are turned off as the updater handles
everything. If you need the custom events, you MUST turn off the
built-in dialog. pubkey must be a valid public-key generated with
Tauri CLI. See Signing updates for details.
The Tauri updater will periodically send an HTTP GET request to the
previously configured endpoints. The return type must be
application/json and adhere to one of the following schemas.
The dynamic response format allows you fine grained control over the
update process. If the update server determines - based on the update
request - that an update is necessary, it must respond with a status
code of 200 OK and include valid update information of the following
shape:
{
  "url": "https://mycompany.example.com/myapp/releases/myrelease.tar.gz",
  "version": "0.0.1",
  "notes": "Theses are some release notes",
  "pub_date": "2020-09-18T12:29:53+01:00",
  "signature": ""
}
The only required keys are url and version; all others are
optional. pub_datemust be formated according to ISO 8601 if
present and signature must be a valid signature generated with the
Tauri Cli.
If no update is required your server must respond with a status code
of 204 No Content.
To simplify the usage with static file hosting solutions, like AWS S3,
Tauri supports an alternative static JSON response format. Tauri
checks against the version field, and if the version is smaller than
the current one and the platform is available, it triggers an update.
The format of this file is detailed below:
The only required keys are version and platforms.<platform>.url;
All others are optional. pub_datemust be formated according to ISO
8601 if present and platforms.<platform>.signature must be a
valid signature generated with the Tauri CLI.
By default, the updater uses a built-in dialog API from Tauri.
The dialog release notes are filled with the note property of the
update response. If the user accepts, the update is downloaded and
installed. Afterward, the user is prompted to restart the application.
Emitted while the update is downloaded and installed, you may use this
to display a progress bar.
status    [ERROR/PENDING/DONE]
error     String/null
PENDING is emitted when the download is started and DONE when the
install is complete. You can then ask to restart the application.
ERROR is emitted when there is an error with the updater. We suggest
listening to this event even if the dialog is enabled.
The updater offers built-in signature checking to ensure your update
is authentic and can be safely installed. When present, the update
response's signature field and the downloaded artifact will be
checked against the configured pubkey using Minisign, a simple
signature system using Ed25519 public-key signatures.
Prerequisites
This guide assumes you have the Tauri CLI and a working Tauri
application.
Generate Keypair
To successfully sign and verify updates you need a Keypair,
consisting of
A Public-Key (pubkey) - Used to verify the signatures. This
key is safe to share with others and should be added to your
tauri.conf.json.
A Private key (privkey) - Used to sign your update and
should NEVER be shared with anyone. If you lose this key,
you'll NOT be able to publish a new update to the current user
base. It is crucial to store it in a safe place where you can
always access it.
To generate your keypair using the Tauri CLI, open a terminal and
enter the following command:
tauri signer generate -w ~/.tauri/myapp.key
Tauri Configuration
The Tauri bundler will automatically sign update artifacts if the
TAURI_PRIVATE_KEY and TAURI_KEY_PASSWORD environment variables
are set. TAURI_PRIVATE_KEY must be the string representation of
your private key or a path pointing to your private key file.
TAURI_KEY_PASSWORD must contain the private key's password if you
configured one.
Tauri provides lots of options for customizing the look and feel of
your app's window. You can create custom titlebars, have transparent
windows, enforce size constraints, and more. This guide contains a
number of quick examples for common cases.
To make the custom titlebar work, you need to disable decorations for
the window by setting tauri.windows.decorations,
WebviewWindow.setDecorations or WindowBuilder::decorations to
false. Next, you need to add the HTML for the titlebar. Put this at
the top of your <body> tag. Notice the data-tauri-drag-region data
attribute, it allows you to drag the window around like a native
titlebar would.
Now you need to add some CSS for the titlebar to keep it at the top of
the screen and style the buttons. Note that you may need to move the
rest of your content down so that the titlebar doesn't cover it.
Native application menus can be attached to individual windows or the
whole application. Note that window-specific menus are only supported
on Windows and Linux, but not on macOS.
To create a native window menu, import the Menu, Submenu,
MenuItem and CustomMenuItem types. The MenuItem enum contains a
collection of platform-specific items (currently not implemented on
Windows). The CustomMenuItem allows you to create your own menu
items and add special functionality to them.
use tauri::{CustomMenuItem, Menu, MenuItem, Submenu};
Create a Menu instance:
// here `"quit".to_string()` defines the menu item id,
// and the second parameter is the menu item label.
let quit = CustomMenuItem::new("quit".to_string(), "Quit");
let close = CustomMenuItem::new("close".to_string(), "Close");
let submenu = Submenu::new("File", Menu::new().add_item(quit).add_item(close));
let menu = Menu::new()
    .add_native_item(MenuItem::Copy)
    .add_item(CustomMenuItem::new("hide", "Hide"))
    .add_submenu(submenu);
The defined menu can be set to all windows using the menu method of
the tauri::Builder struct:
use tauri::{CustomMenuItem, Menu, MenuItem, Submenu};

fn main() {
  let menu = Menu::new(); // configure the menu
  tauri::Builder::default()
    .menu(menu)
    .run(tauri::generate_context!())
    .expect("error while running tauri application");
}
Each CustomMenuItem triggers an event when clicked. Use the
on_menu_event callback to handle them, either on the global
tauri::Builder or on an specific window.
This guide walks you through adding a tray icon to the systems'
notification area. Tray icons have their own context menu.
On macOS and Ubuntu, the Tray will be located on the top right corner
of your screen, adjacent to your battery and wifi icons. On Windows,
the Tray will usually be located in the bottom right corner.
iconPath must point to a PNG file on macOS and Linux, and a .ico
file must exist for Windows support. iconAsTemplate is a boolean
value that determines whether the image represents a Template Image on
macOS.
Optionally you can add a context menu that is visible when the tray
icon is clicked. Import the SystemTrayMenu, SystemTrayMenuItem and
CustomMenuItem types:
use tauri::{CustomMenuItem, SystemTrayMenu, SystemTrayMenuItem};
Create the SystemTrayMenu:
// here `"quit".to_string()` defines the menu item id,
// and the second parameter is the menu item label.
let quit = CustomMenuItem::new("quit".to_string(), "Quit");
let hide = CustomMenuItem::new("hide".to_string(), "Hide");

let tray_menu = SystemTrayMenu::new()
    .add_item(quit)
    .add_native_item(SystemTrayMenuItem::Separator)
    .add_item(hide);
Add the tray menu to the SystemTray instance:
let tray = SystemTray::new().with_menu(tray_menu);
The created SystemTray instance can be set using the system_tray API
on the tauri::Builder struct:
use tauri::{CustomMenuItem, SystemTray, SystemTrayMenu};

fn main() {
    let tray_menu = SystemTrayMenu::new(); // insert the menu items here
    let system_tray = SystemTray::new().with_menu(tray_menu);
    tauri::Builder::default()
        .system_tray(system_tray)
        .run(tauri::generate_context!())
        .expect("error while running tauri application");
}
The AppHandle struct has a tray_handle method, which returns a
handle to the system tray, allowing updating tray icon and context
menu items: Updating context menu items
use tauri::Manager;
use tauri::{CustomMenuItem, SystemTray, SystemTrayMenu};

fn main() {
    let tray_menu = SystemTrayMenu::new(); // insert the menu items here
    tauri::Builder::default()
        .system_tray(SystemTray::new().with_menu(tray_menu))
        .on_system_tray_event(|app, event| match event {
            SystemTrayEvent::MenuItemClick { id, .. } => {
                // get a handle to the clicked menu item
                // note that `tray_handle` can be called anywhere,
                // just get a `AppHandle` instance
                // with `app.handle()` on the setup hook
                // and move it to another function or thread
                let item_handle = app.tray_handle().get_item(&id);
                match id.as_str() {
                    "hide" => {
                        let window = app.get_window("main").unwrap();
                        window.hide().unwrap();
                        // you can also `set_selected`, `set_enabled`
                        // and `set_native_image` (macOS only).
                        item_handle.set_title("Show").unwrap();
                    }
                    _ => {}
                }
            }
            _ => {}
        })
        .run(tauri::generate_context!())
        .expect("error while running tauri application");
}
To add a Sidecar binary to your Tauri app, add the executables'
absolute or relative path to the tauri.bundle.externalBin array.
The Tauri CLI will bundle all sidecars into the final package.
When bundling the final application, the Tauri bundlers appends the
[target triple] to the specified path, so for example, with the
following configuration "externalBin": ["bin/python"] Tauri will
attempt to bundle the following file
src-tauri/bin/python-x86_64-unknown-linux-gnu on x86 Linux and
src-tauri/bin/python-aarch64-apple-darwin on Apple silicon macOS.
To find your current platforms' target triple, open a terminal and
enter the following command:
rustc -Vv | grep host
Here's a Node.js script to append the target triple to a binary:
Tauri takes care of bundling the Sidecar binary, but you are in charge
of actually running it. This means you are also in charge of killing
the child process when your app closes; otherwise, you pollute the
users' machine with orphan processes.
The tauri::api::process::Command struct provides a convenient
constructor for Sidecar binaries, Command::new_sidecar, that will
take care of appending the correct target triple to match the filename
you had to assign previously.
let (mut rx, mut child) = Command::new_sidecar("my-sidecar")
  .expect("failed to create `my-sidecar` binary command")
  .spawn()
  .expect("Failed to spawn sidecar");

tauri::async_runtime::spawn(async move {
  // read events such as stdout
  while let Some(event) = rx.recv().await {
    if let CommandEvent::Stdout(line) = event {
      window
        .emit("message", Some(format!("'{}'", line)))
        .expect("failed to emit event");
      // write to stdin
      child.write("message from Rust\n".as_bytes()).unwrap();
    }
  }
});
The sidecar feature can only bundle self-contained binaries, making
Node.js applications difficult to bundle. You can either include a
stock Node.js binary as a Sidecar and your JavaScript file as a
Resource, or compile the Node.js runtime and code into a standalone
binary using pkg. The official Tauri sidecar example demonstrates
the latter technique.
In case your Frontend is rather heavy and takes some time to load, or
you need to perform some initialization procedures in Rust before
displaying your main window, a splash screen can improve the loading
experience for the user.
Your main window will be hidden, and the splashscreen window will show
when your app is launched. Next, you'll need a way to close the
splashscreen and show the main window when your app is ready. How you
do this depends on what you are waiting for before closing the
splashscreen.
If you are waiting for your web code, you'll want to create a
close_splashscreencommand.
use tauri::Manager;
// Create the command:
// This command must be async so that it doesn't run on the main thread.
#[tauri::command]
async fn close_splashscreen(window: tauri::Window) {
  // Close splashscreen
  if let Some(splashscreen) = window.get_window("splashscreen") {
    splashscreen.close().unwrap();
  }
  // Show main window
  window.get_window("main").unwrap().show().unwrap();
}

// Register the command:
fn main() {
  tauri::Builder::default()
    // Add this line
    .invoke_handler(tauri::generate_handler![close_splashscreen])
    .run(tauri::generate_context!())
    .expect("failed to run app");
}
Then, you can call it from your Frontend:
// With the Tauri API npm package:
import { invoke } from "@tauri-apps/api/tauri";
// With the Tauri global script:
const invoke = window.__TAURI__.invoke;

document.addEventListener("DOMContentLoaded", () => {
  // This will wait for the window to load, but you could
  // run this function on whatever trigger you want
  invoke("close_splashscreen");
});
If you are waiting for Rust code to run, put it in the setup
callback so you have access to the App instance:
use tauri::Manager;
fn main() {
  tauri::Builder::default()
    .setup(|app| {
      let splashscreen_window = app.get_window("splashscreen").unwrap();
      let main_window = app.get_window("main").unwrap();
      // we perform the initialization code on a new task so the app doesn't freeze
      tauri::async_runtime::spawn(async move {
        // initialize your app here instead of sleeping :)
        println!("Initializing...");
        std::thread::sleep(std::time::Duration::from_secs(2));
        println!("Done initializing.");

        // After it's done, close the splashscreen and display the main window
        splashscreen_window.close().unwrap();
        main_window.show().unwrap();
      });
      Ok(())
    })
    .run(tauri::generate_context!())
    .expect("failed to run app");
}
Tauri ships with a default iconset based on its logo. This is probably
NOT what you want when you ship your application. To help with this
common situation, Tauri provides the tauricon command that will
take an input file ("./app-icon.png" by default) and create all the
icons needed for the various platforms:
npm tauricon --help

Description
  Create all the icons you need for your Tauri app.
  The icon path is the source icon (png, 1240x1240 with transparency), it defaults
  to './app-icon.png'.

Usage
  tauricon [ICON-PATH]

Options
  --help, -h          Displays this message
  --log, l            Logging [boolean]
  --target, t         Target folder (default: 'src-tauri/icons')
  --compression, c    Compression type [optipng|zopfli]
  --ci                Runs the script in CI mode
Created icons will be placed in your src-tauri/icons folder, where
they will automatically be included in your built app.
If you need to source your icons from some other location, you can
edit this part of the src-tauri/tauri.conf.json file:
With Tauri you can give your app a Command Line Interface (CLI)
through clap, a robust command-line argument parser written in Rust.
With a simple CLI configuration in your tauri.conf.json file, you
can define your interface and read its argument matches map on
JavaScript and/or Rust.
Under tauri.conf.json, you have the following structure to configure
the interface:
Filename: src-tauri/tauri.conf.json
{
  "tauri": {
    "cli": {
      // command description that's shown on help
      "description": "",
      // command long description that's shown on help
      "longDescription": "",
      // content to show before the help text
      "beforeHelp": "",
      // content to show after the help text
      "afterHelp": "",
      // list of arguments of the command, we'll explain it later
      "args": [],
      "subcommands": {
        "subcommand-name": {
          // configures a subcommand that is accessible
          // with `./app subcommand-name --arg1 --arg2 --etc`
          // configuration as above, with "description", "args", etc.
        }
      }
    }
  }
}
Note: All JSON configurations here are just samples, many other
fields have been omitted for the sake of clarity.
Users can run your app as ./app --type foo bar,
./app -t foo -t bar or ./app --type=foo,bar and the arg matches
map will define type as ["foo", "bar"].
Users can run your app as ./app -v -v -v,
./app --verbose --verbose --verbose or ./app -vvv and the arg
matches map will define verbose as true, with occurrences = 3.
Some CLI applications has additional interfaces as subcommands. For
instance, the git CLI has git branch, git commit and git push.
You can define additional nested interfaces with the subcommands
array:
use tauri::api::cli::get_matches;

fn main() {
    let context = tauri::generate_context!();
    let cli_config = context.config().tauri.cli.clone().unwrap();

    match get_matches(&cli_config) {
        // `matches` here is a Struct with { args, subcommand }.
        // `args` is `HashMap<String, ArgData>`
        // where `ArgData` is a struct with { value, occurances }.
        // `subcommand` is `Option<Box<SubcommandMatches>>`
        // where `SubcommandMatches` is a struct with { name, matches }.
        Ok(matches) => {
            println!("{:?}", matches)
        }
        Err(_) => {}
    };

    tauri::Builder::default()
        .run(context)
        .expect("error while running tauri application");
}


 Vite
Vite Webpack
 HTML/CSS/JS